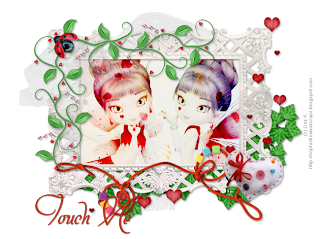
This tutorial was written by and copyrighted to Seven on 6th March 2010.
For this tutorial you will need:
- Touch Me's PTU-kit Romantic Love which you can purchase here
- 2 fairy tubes of your choice (I used stunning posers from Lisa K.)
- font of your choice (I used Mon Amour)
Let's start:
- Open a new canvas 650 x 500px
- Copy and paste a frame (elemts_(41)) and resize if necessary.
- With your magic-wand click inside your frame and expand the selection about 2.
- Copy and paste a paper of your choice.
- Selections invert and press delete.
Selections none.
- Move this layer under the frame layer.
- Copy and paste your tubes and arrange them in your frame.
Erase the parts of them which are looking through the frame.
Add a dropshadow and their mix mode on overexpose.
- Highlight he frame layer and dropshadow it.
- Merge these layers visible
- Copy and paste the ivy (elemts_(62), resize and rotate it a bit.
Move it under the frame and add a dropshadow.
- Copy and paste the fishnet (elemts_(50)), resize a bit and add a small dropshadow.
- Highlight your frame layer.
- Copy and paste the doodled flower (elemts_(34)), resize and dropshadow it.
Move it to the left higher corner of your frame.
- Now you can decorate your tag with love or like I did:
- Copy and paste the ladybug.
Resize and dropshadow it.
Move it to the left over the flower doodle.
- Copy and paste the fishnet (elemts_(50)) again, resizeit very small and add a small dropshadow.
Move this layer to the left higher bottom under the ladybug and doodle flower.
- Copy and paste the hearts (elemts_(28)).
Resize and dropshadow it.
Arrange it to the right.
- Copy and paste the string (elemts_(70))
Move it in the middle of your frame boarder.
Resize and dropshadow it.
- Copy and paste the pillow heart (elemts_(11)) and resize it.
Move it to the right and add a dropshadow.
- Choose a matching background colour and your font and write your name or text.
Give it a small dropshadow.
- At least just add copyright info and/or watermark


