


This tutorial was written by and copyrighted to Seven on 13th March 2010
Hrr Hrr, I think I'm one of the few people who don't like or who haven't ever read or seen Twilight.
I don't like cheeeeeesy Vampire Stories. Vampires are something mystical and dangerous. I prefer older vampire ones like Nosferatu, Dracula etc. Blade is very nice too. xD
But back to topic I've got a lot of lovely friends who are Twilight addicted.
So, I dedicate this tut to all my twilight loving friends!
For this tutorial you will need:
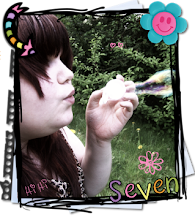
-Edward-kit from Polka Dot Scraps which you can get here
- 1 (Twilight) tube of your choice (I used the fabulous art of Zindy Nielsen. I used a free art and you can download it on her site.)
- Font of your choice (I used Monica)
Let's start:
- Open a new canvas 550x550px.
You can resize it later.
- Copy and paste frame1 and resize it if necessary.
- With your magic wand click inside of the three circles and expand the selection about 3.
- Copy and paste a paper of your choice.
- Selection invert and hit delete.
Selection none.
Move this layer under the frame layer.
- Highlight the frame layer and click with your magic wand in the first circle.
Expand the selection about 3.
- Copy and paste your tube and resize it if necessary.
Arrange Edward's or Bella's head in the circle.
Selection invert and press delete.
Selection none.
Move this layer und the frame layer.
- Repeat this step with the other 2 circles.
Add in one of them the head of the other and in the middle one both.
- Highlight your frame layer and dropshadow it.
- Merge these layers visible.
- Copy and paste a bow of your choice (element40), resize and arrange it on your frame where the first and second circle meet each other.
Duplicate this layer and mirror it vertical.
Move this layer down where the second and third layer meet each other.
Dropshadow both bows.
(See my tag above for help)
- Copy and paste a flower (element43) and resize it.
Move it over the middle of your first bow.
Duplicate and mirror the flower.
Move it over your second bow.
Dropshadow them
- Copy and paste the paperheart (element21) and mirror it vertical.
Move this layer under your frame layer.
Arrange the heart under your first circle a bit to the right.
Dropshadow it.
- Copy and paste the clock (element47) and resize it if necessary.
Move this layer under your frame layer and add a dropshadow.
Arrange in the bottom part of your tag.
- Choose a matching background colour and your font.
Write your name or text and rotate it about 90 degrees.
Add a small dropshadow and arrange it.
- At least just add copyright infos and/or watermark and save as.
Easy, hu?