Samstag, 24. April 2010

A Note

Just a short note to let you all know that I left all my CT Teams.
At the moment I don't have enough time.
But don't worry I will keep on writing tutorials :)
There a millions of freebies and I've got a huge HD with a lot of stuff to play with!

Hugs
Seven

Mittwoch, 7. April 2010

Get The Funk Back


This tutorial was written by and copyrighted to Seven on 07th April 2010

For this tutorial you will need:

- Chassity's FTU-kit The 80ies Goodie Train which you can download here
- 3 tubes of your choice (I used a cool tube of Ismael Rac which you can purchase at AMI)
- Cora's Funk Template which you can download from her blog here (It's in the second download)
- font of your choice (I used Inspiration)


Let's start:

- Open your template and duplicate it with SHIFT+D.

- Highlight the white frame of the circle and add a dropshadow.

- Highlight the circle inlay.
Selections - All - Free - Not Free.
Delete the layer.
Copy and paste a paper of your choice.
Selections - Invert.
Press delete button.
Selection none.

- Highlight one of the small rectangle frame inlays.
Selections - All - Free - Not Free.
Delete the layer.
Copy and paste a paper of your choice.
Selections - Invert.
Press delete button.
Copy and paste your first tube and arrange it your frame.
Press delete button again.
Selection - none.
Add a dropshadow to your tube.
Merge the 3 frame layers (frame, tube, frame inlay) visible and dropshadow it.

- Repeat the above mention step with the other two rectangle frames.
Add different paper and tube.

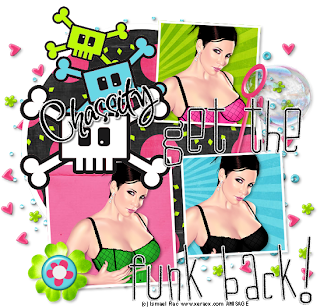
- Highlight the "skulls"
I changed the colors that they fit to my tag.
Dropshadow them.

- Copy and paste frame4, resize if necessary and dropshadow it.
Move it under your big white circle layer.

- Copy and paste element4, resize and dropshadow it.
Arrange it over frame4 under the white circle.

- Copy and paste element3, resize and dropshadow it.
Mirror it vertical and arrange it on the right side of your tage.
(I moved a part under one of the frames and one part over a second frame)

- Copy and paste element11, resize and dropshadow it.
Arrange it to the left on the edge of your rectangle frame.

- Choose your font and as background color black.
Write your name and rotate it a bit.
Change the vector to a raster layer.
Selections - All - Free - Not Free.
Expand the selection about 2 or 3.
Add a new rasterlay and fill it with white.
Selection none.
Add some noise and move it under your name.
Merge these both layers and add a small dropshadow.

- At least just add copyright/watermark infos and save as!

Dienstag, 6. April 2010

Natures Gift


This tutorial was written by and copyrighted to Seven on 06th April 2010.


For this tutorial you will need:

- PTU-kit Naturel from Sky Scraps which you can purchase here
- tube of your choice (I used the fantastic artwork of Igolochka)
- a nature picture of your choice (I got mine at stock.xchng)
- font of your choice (I used FleurDeLeah)


Let's start:


- Ope a new canvas 550 x 550 px.

- Copy and paste Frame9 and resize it if needed.

- With your magic wand click inside of the frame end expand the selection about 3px.

- Copy and paste a paper of your choice and move it under the frame layer.
Selection invert and press delete button.

- Copy and paste your picture and arrange it in your frame.
Press delete again.
Selection none.

- Reduce the opacity of your picture to 25-35 %.

- Dropshadow your frame.

- Copy and paste your tube and arrange it in your frame.
Erase parts of the body which are lookig throught the border below.
Dropshadow it.

- Copy and paste Element6, resize and dropshadow it.
Move this layer under your frame and paper layers and arrange it a bit to the bottom.

- Copy and paste Mesh3, resize and dropshadow it.
Arrage it under your frame a bit to the top.

- Highlight your frame layer.

- Copy and paste Mesh2, mirror it vertical and resize it.
Arrange it to the right of your frame.
Add a dropshadow.

- Copy and paste Feuillage1.
Resize and dropshadow it and arrange it also to the right over your mesh.

- Copy and paste Butterfly3, resize and dropshadow it.
Arrange it to the top on the left side.

- Copy and paste Feuillage3, resize and dropshadow it.
Move it to the edge of your frame on the left.

- Copy and paste Flower1 and resize it.
Arrange it over your feuillage and add a dropshadow.

- Choose two matching colors and your font and write your name.
Add a small dropshadow and merge all visible.

- At least add your watermark/copyright and save as.

Ready!

TOU

All tutorials are written by myself and any resemblance to any other tutorial is purely coincidental.
You are allowed to make tags, stats, layout what ever your want with them.
You are not allowed to make any monetary gain with them.
You are not allowed to hotlink.
I do not allow to translate it whithout my written permission!


It would be great if you mail me your results at coroners.sun@gmail.com

  © Blogger template Ramadhan Al-Mubarak by Ourblogtemplates.com 2008

Back to TOP