


This tutorial was written by and copyrighted to Seven on 12th May 2009
For this tutorial you will need:
- My "Girl Dreams" -kit which you can purchase here, here, here or here
- mask of choice - WSL_Mask79 which you can download here
Let's start:
- open a new white canvas 700x500px, you can resize it later
- add a paper of your choice and use the mask on it (merge group layers)
- copy and paste a frame of your choice, resize and add a dropshadow
- use your magic-wand click inside of the frame and expand the selection to 10px
- copy and paste a paper and pull it under the frame-layer (selection - none)
- copy and paste the rainbow, resize it and add a dropshadow
copy and paste the castle, resize it and add a dropshadow, put it over the the frame layer and erase the parts which are over the downside part of the frame
copy and paste the unicorn, resize it and add a dropshadow, put it over the the frame layer and erase the parts which are over the downside part of the frame
copy and paste the crown, rotate it a bit, resize it and add a dropshadow
copy and paste a princess, resize it and add a dropshadow
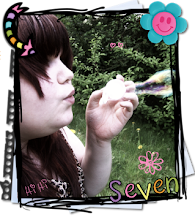
(see my picture for help)
- decorate your image with elements and add a dropshadow
- at least add your name and if necessary copyright info, resize it and save as .jpg
For this tutorial you will need:
- My "Girl Dreams" -kit which you can purchase here, here, here or here
- mask of choice - WSL_Mask79 which you can download here
Let's start:
- open a new white canvas 700x500px, you can resize it later
- add a paper of your choice and use the mask on it (merge group layers)
- copy and paste a frame of your choice, resize and add a dropshadow
- use your magic-wand click inside of the frame and expand the selection to 10px
- copy and paste a paper and pull it under the frame-layer (selection - none)
- copy and paste the rainbow, resize it and add a dropshadow
copy and paste the castle, resize it and add a dropshadow, put it over the the frame layer and erase the parts which are over the downside part of the frame
copy and paste the unicorn, resize it and add a dropshadow, put it over the the frame layer and erase the parts which are over the downside part of the frame
copy and paste the crown, rotate it a bit, resize it and add a dropshadow
copy and paste a princess, resize it and add a dropshadow
(see my picture for help)
- decorate your image with elements and add a dropshadow
- at least add your name and if necessary copyright info, resize it and save as .jpg
