This tutorial was written by and copyrighted to Seven on 10th February 2010.
For this tutorial you will need:
- My PTU-kit Saranghe which you can purchase here or here
- A fairy tube of your choice (I used the tube which came with the kit. It's a stunning poser from Lisa K.)
- font of your choice (I used Liorah BT)
Let's start:
- Open a new canvas size 500 x 500 px.
You can resize it later.
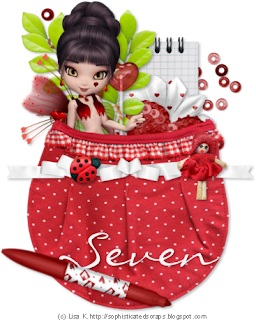
- Copy and paste the bag (bag_01), resize it and add a nice dropshadow.
- Copy and paste the beads, resize and dropshadow them and move them under the bag layer.
- Copy and paste the notelock, resize and dropshadow it.
Arrange it.
- Copy and paste a leave, resize and dropshadow it.
Move it to the left.
- Copy and paste flower or heart elements and arrange them.
Don' forget to resize and dropshadow it.
- Highlight the leaf-layer and copy and paste a lollipop.
Resize and add a dropshadow.
- Copy and paste your fairy tube.
Resize it and dropshadow.
Arrange it to a matching place "in" your bag.
-Highlight your bag layer
Make sure that all the elements and fairy are covered by the bag.
- Copy and paste a ribbon (ribbon02) and resize it.
Arrange it over your bag and dropshadow it.
- Copy and paste the doll and the ladybug or other elements.
Resize and dropshadow them.
Arrange them over your bag and ribbon.
- Copy and paste the marker and resize it.
Move it a little bit of the lower part of the bag.
Rotate it and drophadow it a bit.
- Set a matching background color and choose your font.
Write your name and add a dropshadow.
- At least just add copyright infos and/or watermark and save as.
This was easy, or?


