This tutorial was written by and copyrighted to Seven on 27th December 2009.
For this tutorial you will need:
- Wicked Princess Scraps' PTU-kit Whispered Pixie which you can purchase here
- A fairy tube of your choice (I used the one which came with the kit)
- Mask of choice (I used WSL_Mask220 which you can get here)
- a font of your choice (Mr Lackboughs)
Let's begin
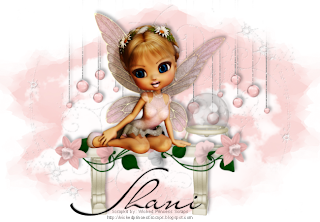
- Open a new canvas 650x450 px.
- Copy and paste a paper or fill it with colour of your choice.
Apply the mask on it.
- Copy and paste pixieflourish, resize and move it to the left side.
Duplicate this layer and mirror it vertical and horizontal.
Add a small and soft dropshadow.
- Copy and paste the cloud and resize if necessary.
- Copy and paste dangle.
Resize it and move it bit to the top.
Erase with a soft eraser parts of the string.
- Copy and paste the bench.
Resize and dropshadow it.
Move it a bit to the down.
- Copy and paste pansy and resize it.
Arrange it on the side of the bench.
Add a dropshadow.
- Copy and paste daffodill and resize it very small.
Move it to the left side of your bench.
Duplicate this layer and mirror it vertical.
Add dropshadow.
- Copy and paste ball.
Resize it and position it to the right on your bench.
(It should stand on it)
Add a smal dropshadow.
- Copy and paste your fairy.
Resize and move it in the middle of the bench.
She should sit or lie on it.
Add a dropshadow to her.
- With a nice font write your name on your tag and dropshadow it.
- At least you just need to add copyright infos and save as.
This was easy, or?


