Sonntag, 27. Dezember 2009

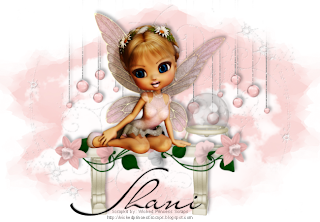
Whispered Pixie


This tutorial was written by and copyrighted to Seven on 27th December 2009.


For this tutorial you will need:

- Wicked Princess Scraps' PTU-kit Whispered Pixie which you can purchase here
- A fairy tube of your choice (I used the one which came with the kit)
- Mask of choice (I used WSL_Mask220 which you can get here)
- a font of your choice (Mr Lackboughs)


Let's begin

- Open a new canvas 650x450 px.

- Copy and paste a paper or fill it with colour of your choice.
Apply the mask on it.

- Copy and paste pixieflourish, resize and move it to the left side.
Duplicate this layer and mirror it vertical and horizontal.
Add a small and soft dropshadow.

- Copy and paste the cloud and resize if necessary.

- Copy and paste dangle.
Resize it and move it bit to the top.
Erase with a soft eraser parts of the string.

- Copy and paste the bench.
Resize and dropshadow it.
Move it a bit to the down.

- Copy and paste pansy and resize it.
Arrange it on the side of the bench.
Add a dropshadow.

- Copy and paste daffodill and resize it very small.
Move it to the left side of your bench.
Duplicate this layer and mirror it vertical.
Add dropshadow.

- Copy and paste ball.
Resize it and position it to the right on your bench.
(It should stand on it)
Add a smal dropshadow.

- Copy and paste your fairy.
Resize and move it in the middle of the bench.
She should sit or lie on it.
Add a dropshadow to her.

- With a nice font write your name on your tag and dropshadow it.

- At least you just need to add copyright infos and save as.

This was easy, or?

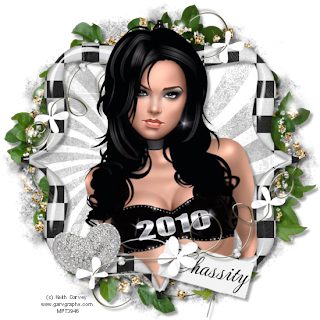
2010


This tutorial was written by and copyrighted to Seven on 27th December 2009.


For this tutorial you will need:

- Chassity's FTU-kit Bling In The New Year which you can download here
- A tube of your choice (I used an amazing tube of Keith Garvey which you can purchase at MPT)
- Mask of choice (I used WSL_Mask75 which you can get here)
- a font of your choice (I used MeaCulpa)


Let's start:

- Open a new canvas 550x550 px.

- Copy and paste a paper of your choice and apply the mask.

- Copy and paste frame2 and resize if necessary.

- With you magic wand click inside the frame and expand the selection about 6px.

- Copy and paste a paper of your choice and invert the selection.
Press delete.
Selection none.

- Dropshadow your frame.

- Copy and paste element22 and move it to the left.
Move this layer under the frame/paper layer.

- Duplicate the leafes 3 times and postion every leaf so that on every side of the frame is a part of them. (see my tage above for help)
Merge those 4 layers together and add a dropshadow.

- Copy and paste frame5, resize if necessay and add dropshadow.

- Highlight your frame2 layer.

- Copy and paste your tube.
Resize if necessary and add a dropshadow.
Erase parts of the body which are looking throught the frame.
She should be in the frame but the head should be over the frame.
(see my tag for help)

- Copy and paste element7 and resize it.
Move it to the right.

- Duplicate this layer and mirror it vertical and horizontal.
Move this duplicated layer under your tube layer.

- Dropshadow them both.

- Copy and paste element4, resize and rotate it a bit.
Move this layer under the element7-layer and postion it to the left.
Add a dropshadow.

- Copy and paste element10, mirror it horizontal and vertical.
Resize it and add a drpshadow.
Move it also under the element7-layer.
The knot of its string should be under one of the paper-flowers.

- Write your name or text on the tag.

- At least just add copyright infos and save as.

Ready ♥


Freitag, 25. Dezember 2009

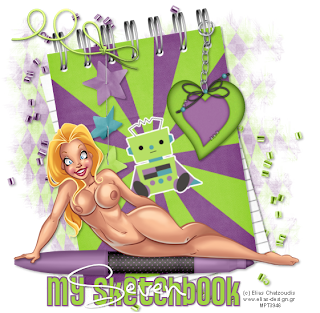
My Sketchbook *AC*


This tutorial was written by and copyrighted to Seven on 25th December 2009.


For this tutorial you will need:

- My PTU-kit My Diary which you can purchase here
- A lying tube of your choice (I used a totally sexy tube of Elias Chatzoudis which you can purchase at MPT)
- Mask of choice (I used WSL_Mask297 which you can get here)
- 2 fonts of your choice (I used Pussycat and LunaBar)


Let's start:

- Open a new canvas 600x600 px. You can resize it later.

- Copy and paste a paper of your choice and apply the mask.
Merge the mask layer.
Reduce the opacity to 60%.

- Copy and paste one of the beads (bead_05, _06, _07 or _08), resize it and dropshadow it.
Move it to the left upper side.

- Copy and paste another one of the beads, resize and dropshadow it.
Mirror it vertical and horiontal.
Move it to the right lower side.

- Copy and paste one of the note books (block_03) and resize it if necessary.
Rotate it a little bit of your choice.

- Copy and paste one of the stickers (sticker_01, _02, _03 or _04) and move it in the middle of your notebook.
Don't forget to resize and rotate it.

- Copy and paste one of the keychains, resize and move it to the right ring of the notebook.
Erase some parts of the keychain ring so that it looks if it woul hand on it.
(see my tag above for help)
Add a dropshadow.

- Copy and paste one of the bows, resize it and move it to the top on the rings of the book.
Dropshadow it.

- Copy and paste the star string and resize it.
Move this layer under the bow layer and add a dropshadow.

- Copy and paste one of the marker, resize if necessary and add a dropshadow.
Move it to the lower part of your book.

- Copy and paste your woman tube and arrange it on the marker.
She should lying on it.
Dropshadow her.

- Choose a background and a foreground colour and a fat font (Pussycat) write your text and dropshadow it.

- Close the foreground colour and choose a light background colour and you written font (LunaBar).
Write your name over your bigger text and give it a small dropshadow.

- At least you just need to add copyright/watermark infos and save as.

Hope you liked it!

Mittwoch, 23. Dezember 2009

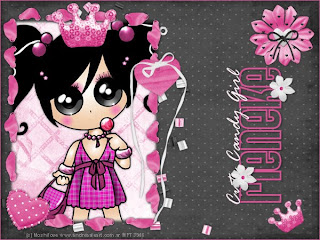
Cute Candy Girl


his tutorial was written by and copyrighted to Seven on 22nd December 2009.


For this tutorial you will need:

-Rieneke's PTU-kit Black White Collection: Pink which you can get here
- A tube of your choice (I used a totally cute tube of Moshilove which you can purchase at MPT)
- 2 fonts of choice (I used Pussycat and Rage Italic)


Let's begin:

- Open a new canvas 600x450px.

- Select all.
Copy a paper of your choice and paste into the selection.
Selection none.

- Copy and paste a ribbon frame of your choice (frame1 or 2), resize and add a dropshadow.
Move it to the left side.

- With your rectangle selection tool draw a selection over the frame and add a new raster layer.
Copy a paper and paste it into the selection.
Move this layer under the frame layer.

- Copy and paste your tube and postion it into the frame.
Resize and dropshadow it.
Maybe you have to erase parts which are looking trough the frame.

- Copy and paste the beads.
Resize if necessary and dropshadow them.
Move them under the frame-paper layer.

- Copy and paste the crown, resize and dropshadow it.
Move it on the head of your tube, but over the frame.

- Duplicate this layer.
Resize it and rotate it a bit.
Move it into the right corner.

- Copy and paste different hearts and flower elements.
Decorate your tag with them.

- Choose a pink/dark font as forgreound colour (no background colour) and a fat font (Pussycat).
Write your name and rotate it about 90 degrees.
Dropshadow it.

- Close the forgreound colour and choose a lighter background colour and your handwritten font (Rage Italic).
Write a small text like Cute Candy Girl and rotate it also about 90 degrees.
Move it over your name.

- Decorate your name with two smaller elements.

- At least just add a 1px border and add copyright infos and save as.

Ready ♥


Mittwoch, 2. Dezember 2009

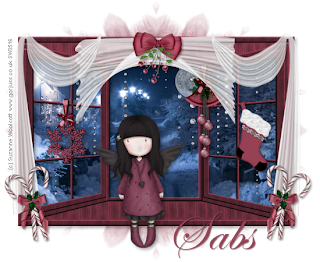
Awaiting Christmas


This tutorial was written by and copyrighted to Seven on 02nd December 2009


For this tutorial you will need:

- Sabs' Principessa -kit, which you can get here.
- A tube of your choice (I used the fabulous work of Suzanne Woolcott. You can purchase her stuff here.)
- A winter-night picture of your choice. (Mine is from stock.xchng)
- Mask of choice (I used WSL_Mask259 which you can get here)
- Font of your choice (I used Edwardian Script)


Let's start:

- Open a new canvas 550 x 450 px.

- Copy and paste a paper of your choice and apply the mask.

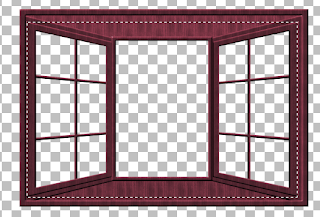
- Copy and paste the window (Window_01) and resize if necessary.
Dropshadow it.

- Use your rectangle selection tool and draw a rectangle so that the window parts are selected.
(click on image for larger view)


- Copy and paste your picture.
Invert the selection and hit delete.
Invert selection again.
Move this layer under the window layer.

- Copy and paste the glitter (BrilliantRain_01) and invert the selection again.
Press delete.
Selection none.
Add a small dropshadow.

- Copy and paste one of the moons, resize it and move it also to a nice place in your window.

- Highlight the window layer.

- Copy and paste the first curtain (Curtain_1) and resize it and move it in the middle of your window.
Copy and paste the other curtain (Curtain_02) and position it over your window.
(See my tag above for help)

- Copy and paste one of the bow ornaments (Ornament_05 or _06), resize it and move it in the middle of the head curtain.
Dropshadow it.

- Copy and paste other elements from your kit (I used a snowflake, bells and a stocking)
and decorate your window with them.
Don't forget to dropshadow them.

- Copy and paste one of the candy canes (CandyCane_01 or _02) and resize it.
Position it on the right side of your window over the curtain and dropshadow it.
Duplicate this layer and mirror it.

- Copy and paste your tube and arrange it on the ledge.
Dropshadow it.

- Choose your font and write your name or text on it.

- At least just add copyright and/or watermark infos and save as.

Ready ♥

TOU

All tutorials are written by myself and any resemblance to any other tutorial is purely coincidental.
You are allowed to make tags, stats, layout what ever your want with them.
You are not allowed to make any monetary gain with them.
You are not allowed to hotlink.
I do not allow to translate it whithout my written permission!


It would be great if you mail me your results at coroners.sun@gmail.com

  © Blogger template Ramadhan Al-Mubarak by Ourblogtemplates.com 2008

Back to TOP