This tutorial was written by and copyrighted to Seven on 24th September 2010.
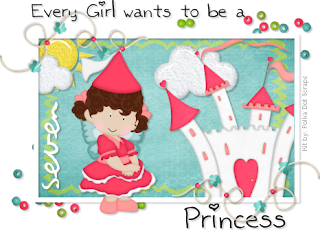
Some ppl asked me if there's a tut for my little tag but it wasn't until today! ;)
For this tutorial you will need:
- Chassity's PTU-kit My Doll kit
- 2 fonts of your choice (I used Kaileen and violation)
Let's begin:
- Open a new canvas 500 x 400 px ( you can crop it later).
- Choose white as your foreground colour and none as background colour.
- With your rectangle (stroke 5 or 6) draw out a rectangle in the middle of your canvas.
Change this layer into a raster lay.
- Use your magic wand and click inside of the rectangel.
Expand the selection about 3.
- Copy and paste a paper of your choice.
- Invert the selection and press delete button on your keyboard.
Selection none.
- Move this layer under your frame layer.
- Highlight your frame layer and add a small matching dropshadow.
- Highlight your paper layer
- Copy and paste the castle, sun and cloud over your paper layer and arrange them
(you will have to resize and maybe rotate them)
Dropshadow them slightly.
- Copy and paste the beads (element43), resize and dropshadow them.
Move this layer under the paper layer.
- Arrange your beads to the right lower edge.
- Duplicate this layer
- Mirror vertical
Mirror horizontal.
- Highlight your frame layer
- Copy and paste the beadstring (element44), resize and dropshadow it.
Arrange it to the right upper boarder of the frame.
- Duplicate this layer.
- Mirror vertical
Mirror horizontal
- Copy and paste one of the fairy princesses (element1 or element2), resize and dropshadow it.
Move it over your tag a little bit to the right side.
- Choose black as your background colour and your first font (Kaileen)
Add your text.
Change vector to raster layer and dropshadow it slightly.
- Highlight your paper layer.
- Choose white as your background colour and your second font (violation)
Type your name and change it to a raster layer.
Dropshadow it.
- Rotate this layer abot 90 degrees and arrange it in your tag.
- Resize/crop and add watermark/copyright sign and save as.
Ready!
I hope you understand everything, It's a long time ago when I wrote a tutorial! *loool*


