This tutorial was written by and copyrighted to Seven on 11th November 2009.
Many people already asked me how I often made my glass-effect.
And today I'm going to tell you how to do it.
I got this effect from my friend Caro!
Thank you sooo much! ♥
I'm sorry that most of the previews are in German but I'm only the German PSP 9 Version.
But I think you can compare and rethink!
For this tutorial you will need:
- a fat font of your choice (I used Coolsville)
- Eye Candy 3.01 - Glass
Let's start!
- Choose a foreground colour or pattern and a matching background colour.
- Choose your textool and search for a fat font.
- Adjust your font size to a size for your liking and the pixel to two or 3, what ever looks like the best.
I added you a picture of my settings for my sample.
(click image to enlarge)

- Change the vector layer to raster layer
- Selection - All - Free - Not free
- Reduce the selection about one mor pixel than your pixel of the font foreground-colour.
For example if you used 3 as a pixel size to your font you have to use a 4 for your reducing of the selection.
(You can maybe also click with your magic wand inside of the font)
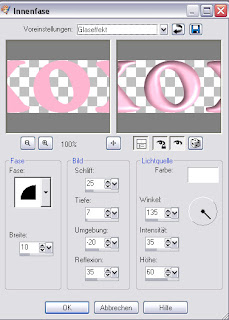
- Use the inner bevel with the following settings
(click image to enlarge)

- Apply your Eye Candy 3.01 - Glass plugin with the following settings
(click image to enlarge)


