Samstag, 28. November 2009

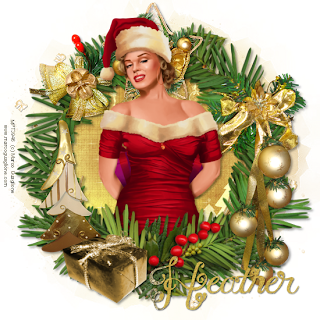
Golden Christmas


This tutorial was written by and copyrighted to Seven on 28th November 2009.


For this tutorial you will need:

- Candy Coated Scraps' PTU-kit Golden Holiday which you can purchase here
- A tube of your choice (I used the beautiful artwork of Marco Guaglione which was in the MPT christmas gift.)
- Mask of choice (I used Vix_Mask109 which you can get here)
- font of choice (I used MT Under Your Skin)


Let's begin:

- Open a new canvas 550x550px.

- Copy and paste a paper of your choice and apply the mask.
Duplicate this mask layer and merge down.

- Copy and paste the round wood frame (elem14) and resize if necessary.

- With your magic wand click inside of the frame and expand the selection about 10px.
Add a new raster-layer.

- Copy an other paper of your choice and paste it into the selection.
Selection none.
Move this layer under the frame layer.

- Highlight your frame layer and dropshadow it

- Copy and paste the wreath (elem42), resize and dropshadow it.

- Copy and paste your tube and arrange it in the frame/wreath.
Erase the parts of the body which are looking over the wreath.
(see my tag for help)
Dropshadow it.

- Copy and paste a star (elem68), resize it and move it on the top of your wreath (under the tube layer).
Add a dropshadow.

- Copy and paste the bells (elem67) and move it on your wreath to the left side.
Resize and dropshadow it.

- Copy and paste the balls (elem79), move it to the ride side, resize and dropshadow it.

- Copy and paste a golden tree (elem73) move it to the left, resize and dropshadow it.

- Copy and paste one of the presents (elem12) and arrange it in front of the tree.
Add a dropshadow.

- Choose a paper in your background color and write your name on your tag.
Dropshadow it.

- At least just add copyright and/or watermark infos and save as.

Ready ♥

Samstag, 14. November 2009

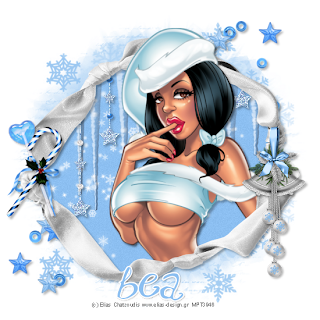
Sweet Winter Wishes


This tutorial was written by and copyrighted to Seven on 14th November 2009.


For this tutorial you will need:

- Bea's PTU-kit Christmas for a Princess which you can get here
- A tube of your choice (I used a totally sexy tube of Elias Catzoudis which you can purchase at MPT)
- 2 Masks of choice (I used WSL_Mask236 which you can get here and Vix_Mask306 which you can get here)
- font of choice (I used unchanges thoughts$)


Let's start:

- Open a new canvas 550x550 px

- Copy and paste a paper of your choice and apply WSL_Mask236.

- Copy and paste the paper again and apply VIX_Mask306.
Duplicate this layer and mirror it horizontal.

- Copy and paste deco03, arrange it and add a dropshadow.

- Copy and paste the ribbon frame (frame09).

- With your magic wand click inside the frame and expand the selection about 5px.

- Copy and paste a new paper and move it under the frame layer.
Invert the selection and hit delete.

- Copy and paste the ice (ice01) and move it a bit to the top.
Hit delete again.

- Copy and paste the star bling (bling01) and move it over the ice.
Hit delete again.

- Selection none.

- Add a dropshadow to your ice, bling and frame layer.

- Highlight your frame-layer.

- Copy and paste your main tube and move it a bit to the right.
Erase these parts of it so that it looks if your tube will come outside of the frame.
(see mine for help ;) )
Add a dropshadow.

- Copy and paste the bells (bells03), resize it a bit and move it over the knot to the right side.
Dropshadow it.

- Copy and paste the lollipop (candy03), resize it and move it over the knot to the left side.
Rotate it a bit and add a dropshadow.

- Copy and paste the candy cane (candy01), resize it and move it over the lollipop.
Add a dropshadow.

- Set your foreground colour to white and your background colour to a maching colour.
Write your name on your tag and add a small dropshadow.

- At least you just need to add copyright and/or watermark and save as.

Ready! ♥

Mittwoch, 11. November 2009

Glass Name Effect


This tutorial was written by and copyrighted to Seven on 11th November 2009.

Many people already asked me how I often made my glass-effect.
And today I'm going to tell you how to do it.
I got this effect from my friend Caro!
Thank you sooo much! ♥

I'm sorry that most of the previews are in German but I'm only the German PSP 9 Version.
But I think you can compare and rethink!


For this tutorial you will need:

- a fat font of your choice (I used Coolsville)
- Eye Candy 3.01 - Glass


Let's start!

- Choose a foreground colour or pattern and a matching background colour.

- Choose your textool and search for a fat font.

- Adjust your font size to a size for your liking and the pixel to two or 3, what ever looks like the best.
I added you a picture of my settings for my sample.
(click image to enlarge)


- Change the vector layer to raster layer

- Selection - All - Free - Not free

- Reduce the selection about one mor pixel than your pixel of the font foreground-colour.
For example if you used 3 as a pixel size to your font you have to use a 4 for your reducing of the selection.

(You can maybe also click with your magic wand inside of the font)

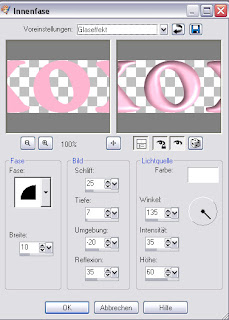
- Use the inner bevel with the following settings
(click image to enlarge)


- Apply your Eye Candy 3.01 - Glass plugin with the following settings
(click image to enlarge)


- Selections - none

- Add a nice dropshadow to your writing :)


This was easy, or?

TOU

All tutorials are written by myself and any resemblance to any other tutorial is purely coincidental.
You are allowed to make tags, stats, layout what ever your want with them.
You are not allowed to make any monetary gain with them.
You are not allowed to hotlink.
I do not allow to translate it whithout my written permission!


It would be great if you mail me your results at coroners.sun@gmail.com

  © Blogger template Ramadhan Al-Mubarak by Ourblogtemplates.com 2008

Back to TOP