Samstag, 29. August 2009

Julie


This tutorial was written by and copyrighted to Seven on 29th August 2009


For this tutorial you will need:

- Julie's Summer Bride -kit which you can get here
- 1 face tube of your choice (I used the fabulous art of Zindy Nielsen, which I bought at MPT. Now you can buy her beautiful art at her own shop.)
- Font of your choice


Let's start:

- Open a new canvas 550x550px. You can resize it later.

- Copy and paste one of the quadratic frames (frame-3 or frame-4).

- Click inside of the frame with your magic-wand and expand the selection about 2px.

- Add a new raster layer and copy and paste a paper of choice into the selection.

- Copy and paste your tube and resize it, if necessary. Invert the selection and press the delete button on your keyboard. Selection none.

- Move the frame above the other two layers and merge them visible.

- Copy and paste one of the circle frames (frame-5 or frame-6) and move it under the first frame-layer. Move it a little bit more to the right side (see my tag above for help).

- Copy and paste a cage, resize and move it on the top of your first frame into the right edge. Add a small dropshadow.

- Copy and paste a flower of your choice, resize and move it to the right bottom edge. Add a small dropshadow.

- Duplicate the flower-layer, resize it a little bit again and move this one to the left edge on the top.

- Choose a nice font and write your name on it. Add a small soft dropshadow.

- At least just add copyrightinfo and/or watermark

Ready ♥

Sonntag, 23. August 2009

Heaven's Angel


This tutorial was written by and copyrighted to Seven on 23rd August 2009


For this tutorial you will need:

- Julie's Heaven Sent -kit which you can purchase here
- 1 Angel tube (I used the one which came with the kit)
- Font of your choice
- Mask of your choice (I used the eraser)


Let's start:

- Open a new canvas 550 x 550 px.

- Copy and paste a paper of your choice and use your mask on it or soften the edges with the eraser-tool.

- Copy and paste a glitter frame, resize and add a small dropshadow.

- Copy and paste the gate-left, resize and add a small dropshadow. Duplicate this layer and mirror it.

- Copy and paste a cherry blossom stem, resize and add a small dropshadow. Move it below the gate layer. Duplicate this layer and mirror it.

- Copy and paste the ivy, resize and dropshadow it. Move it over your gate. Duplicate and Mirror it.

- Copy and paste a flower, resize and dropshadow it. Decorate your ivy with it. Don't forget to duplicate and mirror ;)

- Copy and paste a cloud and resize it if necessary. Duplicate this layer and mirror it. Merge the two cloud layers together and add a very small and light dropshadow.

- Copy and paste your tube, resize and add a dropshadow.

- At least write your name and add a small dropshadow. Add Copyright infos and save as .png

Easy, hu?

Samstag, 22. August 2009

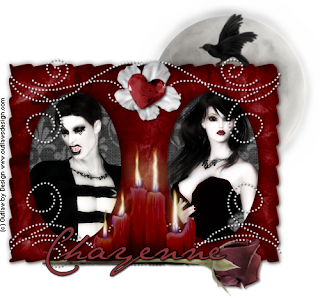
Vampire Romance


This tutorial was written by and copyrighted to Seven on 22nd August 2009


For this tutorial you will need:

- My "Twilight" kit which you can purchase here or here
- 2 Vampire Tubes of your choice (I used the fabulouse poser-art from Outlaws by Design)
- Font of your choice
- Xero - Radiance


Let's start!

- Open a new canvas 550x550px

- Copy and paste a frame (frame19 or frame20) and resize.

- With your magic-wand click inside the circles and expand about 5 px.

- Copy and paste a paper of your choice and move this layer below the frame layer

- Selections invert and press delete button. Selection none.

- With your magic wand click inside a circle of your frame and copy and paste one of your tubes. Resize if necessary. Selections invert, press delete button and selection none. Use the Xero Radiance plugin and add a small dropshadow. Move this layer under the frame but over the paper layer.

- Repeat the above mentioned step with your other tube in the other circle.

- Add a dropshadow on your frame layer.

- Copy and paste a doodle, resize and rotate it about 90°

- Duplicate it and mirror it vertical.

- Merge the two doodle layer, duplicate it and mirror it horizontal.

- Add a small dropshadow on the doodle layer.

- Copy and paste the candles, resize and add a dropshadow. Move it between the two circles of the frame.

- Copy and paste the rose, resize and add a dropshadow. Move it down to the candles.

- Copy and paste a flower, resize and add a dropshadow. Move it between the two circles and on the border above.

- Copy and paste a diamaont heart, resize and add a dropshadow. Move it above the flower layer.

- Copy and paste the moon, resize and move it under the paper layer. Move the moon, that a part of it looks out of the right border from the frame (see my preview for help)

- Copy and paste a raven, resize, add a dropshadow and move it over the moon that it looks like that the raven is sitting on the frame.

- Write your name above the rose and add a dropshadow.

- Add Copyrightinfos and/or your watermark and save as.

Montag, 10. August 2009

Elephants for Chantal


This tutorial was written by and copyrighted to Seven on 10th August 2009.
It's dedicated to the cute daughter of my lovely online-friend Sabs!


For this tutorial you will need:

- Sabs' Pink Illusion kit (Once it was a PTU-kit but know she removed it and started a new thing ;) She allowed me to put the pieces I used in the supplies. TYVM! ♥)
- 2 (elephant-) tubes of your choice (I used the fabulous work of Suzanne Woolcott. You can purchase her stuff here.)
- mask of choice
- maybe font of choice

You can download my material here:
Material


Let's start:

- Open a canvas 600x600px and fill it with white or another background color of your choice.
We can resize it later.

- Copy and paste the paer and use your mask.

- Copy and paste the notepaper, resize and add a dropshadow.

- Copy and paste the raindrops and resize them.
Arrange them on your notepaper. (I erased some part of it. See my tag above for help)

- Copy and paste the satinwrap, resize and arrange it so that it looks like that it would wrap the notepaper. Add a dropshadow.

- Copy and paste the spiralheart, resize and move it under the wrap layer. Add a dropshadow.

- Copy and paste your tubes, resize and add a dropshadove. Arrange them.
(I moved one under and one above the wrap)

- Copy and paste the pen, resize, dropshadow and rotate it a bit. Move it ober the wrap to the left.

- Copy and paste the butterfly, resize and add a dropshadow. Move it to the top.

- Choose a colur of your choice and write your name or text and add a small dropshadow.

- Add copyright-infos if necessary and/or watermark and save as.


Samstag, 1. August 2009

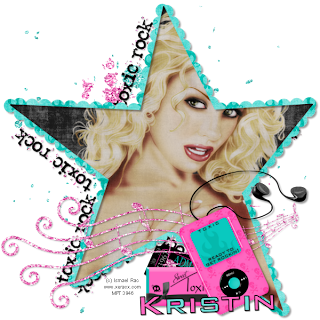
Toxic Star


This tutorial was written by and copyrighted to Seven on 01st August 2009


For this tutorial you will need:

- Kristin's Freebie kit Toxic Rock which you can get here
- A Close Up tube of your choice (I used a fabulous tube of Ismael Rac which he sold at MPT. Now you can get his work at AMI)
- PlugIn Xero - Radiance


Let's start:

- Open a canvas 600x600px

- Copy and paste the star frame (Kristin-TR-Frame2)

- Click inside the star with your magic wand and expand the selection about 2px

- Add a new raster-layer and copy and paste a paper into the selection

- Add another new raster-layer copy and paste your tube into the selection

- Selection none.

- Use the Plugin Xero Radiance with the standard settings and reduce the opacity of the layer a bit

- Add a dropshadow to your frame layer and merge all visible

- Copy and paste glitter under your star

- Copy and paste the wordart (Kristin-TR-Wordart1), enlarge it about 110px and move it a bit to the left

- Copy a noe-doodle and paste it above the star-layer, add a small dropshadow

- Copy and paste the ticket, resize and rotate it a bit, add a dropshadow and move it to the right edge of the star

- Copy and paste the candybar, resize and rotate it a bit, add a dropshadow and move it to the right edge of the star

- Copy and paste an iPod, resize it, add a dropshadow and move it to the right edge of the star a little bit above the candy bar (see my tag for help)

- Write your name with a font of your choice (I used BankGothic) and add a dropshadow

- Add copyright information and save as .png

TOU

All tutorials are written by myself and any resemblance to any other tutorial is purely coincidental.
You are allowed to make tags, stats, layout what ever your want with them.
You are not allowed to make any monetary gain with them.
You are not allowed to hotlink.
I do not allow to translate it whithout my written permission!


It would be great if you mail me your results at coroners.sun@gmail.com

  © Blogger template Ramadhan Al-Mubarak by Ourblogtemplates.com 2008

Back to TOP