Samstag, 24. Oktober 2009

BCA


This tutorial was written by and copyrighted to Seven on 24th October 2009.


For this tutorial you will need:

- Dee's part of the TNW BCA Collab-kit, which you can download here.
- A tube of your choice (I used a cute tube of Suzanne Woolcott which she sold at AMI. Now you can get her work at her own shop. )
- Mask of choice (I used flowerrectangle_MASK I don't know who created this so I can't supply it.)
- Font of your choice (I used Avalanche Script TT)


Let's start

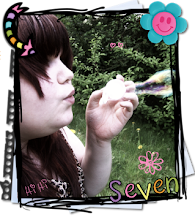
- Open a new canvas 600 x 600 px.

- Copy and paste a paper of your choice and apply the mask.

- Copy and paste a frame (frame1) and resize it a bit.
Rotate it about 90 degrees to the right.

- With your magic-wand click inside of the frame and expand the selection about 5px.
Copy and paste a paper of your choice and move this layer under the frame layer.
Invert the selection and press delete.
Add a dropshadow to your frame.

- Copy and paste your tube and postion it over the frame.
Erase the part of the body of your tube which are looking over the bottom of the frame.
(see my tag for help)
Add a dropshadow to yoour tube.

- Copy and paste one of the bca-ribbons, resize and dropshadow it.
Move it to the right higher edge of the frame.

- Copy and paste one of the beaded strings, resize and dropshadow it.
Move it over the bca-ribbon.

- Copy and paste one of the butterflies. Resize and rotate it a bit.
Move it to the left side over the knot of the frame-ribbon and add a dropshadow.

- Copy and paste on of the tags (tag1 or tag2) and resize it.
Postion it in the middle of the lower part of your frame.
Add a small dropshadow.

- Copy and paste flower6, resize and dropshadow it.
Move it to the bottom of your frame on the left side.

- Copy and paste one of the bca-bears and resize it.
Move it to the bottom of your frame on the right side and add a dropshadow.

- Copy and paste one of the balloons.
Resize and rotate it.
Move this layer below your tube layer.
Dropshadow it.

- Write your name on the tag.

- Just add copyright information and/or watermark and save as.

Ready! ♥

Freitag, 23. Oktober 2009

So is Love


This tutorial was written by and copyrighted to Seven in December 2008 and translated on 23th. July 2009


For this tutorial you will need:
- Scrapkit "A touch of elegance" by Yvette which you can download at Misfits Scraps
- Template "missy_tagtemplate41" which is downloadable on Missy's Blog
- 2 couple tubes of your choice. I used the fabulous art of Zindy S.D. Nielsen which I purchased at MPT. But now she's selling her stuff in her own shop.


Let's start

-
Open the template, duplicate it with CTR+D and close the orignal. On your duplicated canvas delete the Copyright INfo

- On your "scallloped rectangle"-layer: Selections - select all - select free - selection not free and expand it about 1px. Copy and paste a paper from your kit into the selection, invert the selection and press the delete button. Selection - none. Add a dropshadow of your choice.

- Repeat the step above with all the other layers, but use other papers.

- On your "frame background1"-layer: Selections - select all - select free - selection not free. Copy and paste a tubeand resize it. Invert the selectiond an press delete button. Selection none.

- Repeat the step above with "Frame background2" and the 2nd tube.

- Copy and paste a butterfly or another element of your choice, resize and rotate it a bit. Move it to the right and add a dropshadow.

- Write your text and/or name andd give it a small dropshadow

- Add Copyright info and save as.


Garden Twins


his tutorial was written by and copyrighted to Seven in February 2009 and translated on 23th. July 2009


For this tutorial you will need:

- "Rion Rocks" Scrapkit from Created by Jill
- (Twin-) Tube of your choice. I used the fabulos work of Rion Vernon alias Pin Up Toons which you can purchase at C.I.L.M
- Stock-photo of your choice. I got mine at stock.xchng


Let's start

- Open a new white canvas 550x550 px

- Copy and paste a frame. Resize and/or mirror it.

- WIth you magic-wand click in the middle of your frame and expand the selection about 5px.

- Copy and paste a paper of your choice, move it under the frame layer, invert the selection and press the delete button. Invert the selection again

- Copy and paste your photo, invert the selection and press delete button. Deselect. Lower the opacitiy about 44%

- Add a dropshadow to your frame

- Copy and paste a twine and move it to the left of your frame. Add a dropshadow

- Copy and paste flowers, resize, move them onto your twine and add a dropshadow.

- Copy and paste the beadstrings, resize, add a dropshadow and move them at the right side of your frame.

- Copy and paste your tube, move it onto the border below and add a dropshadow.

- Decorate your tag with elements of your choice.

- Write your name on the tag of the beadstring and add a small dropshadow.

- Add copyright infos and save as.

Peep Show Model


This tutorial was written by and copyrighted to Seven in January 2009 and translated on 23th. July 2009


For this tutorial you will need:

-"Peep-Show" Scrapkit from TammyKat & Designs by Sarah purchaseable at Pimp My Tags w/ Scraps
- 2 Tubes of your choice. I used the amazing work of Keith Garveywhich you can puchase at MPT.
- Font of your choice.

Lets Start:

- Open a frame from your kit and duplicate it with CTRL+D. Close the original.

- With your Magic Wand click inside the frame and expand the selection about 4px

- Copy and paste a paper of your choice. Change the selection and pull the delete button. Selection none. Move the paper under the frame layer.

- Copy and paste the first tube, resize and put it in your frame. Change it to "hard-light" and add a dropshadow

- Flatten all visible layers and copy your frame

- Open a new white canvas 600x600 px and paste your copied frame in it.

- Copy and paste the other tube and position it left on your frame. Add a dropshadow.

- Copy and paste the round frame under the frame layer and add a dropshadow.

- Copy and paste the glitter and add it under the round-frame-layer

- Copy and paste a ticket and position it under the frame layer, rotate it a bit and put it on a nice place. Add a dropshadow.

- Decorate your work with other elements.

- Add your name and copyright infos and save as.


Just another Princess


This tutorial was written by and copyrighted to Seven on 23rd October 2009


For this tutorial you will need:

- Sabs' Principessa -kit, which you can get here.
- A tube of your choice (I used a cute tube of Michelle Soneja which you can purchase at MPT)
- Mask of choice (I used WSL_Mask214 which you can get here)
- Font of your choice (I used Yummah Strawberriez)

Let's get ready! ♥


- Open a new canvas 600x600 px.

- Copy and paste a paper of your choice (Paper_05) and apply the mask on it.

- Copy and paste a flower frame of your choice (Frame_01, _02 or _03) and resize it abit.

- With your magic wand click inside of the frame and expand the selection about 3.
Copy and paste a glitter-paper of your choice and move it below the frame layer.
Selection - invert and press delete.
Selection none.
Add a dropshadow to your frame.

- Copy and paste your main tube.
Resize it and add a dropshadow.
Erase the parts from the body of your tube which were looking outside of the frame.


- Copy and paste a butterfly-wrap (wrap_04, _05 or _06) over your tube layer.
Dropshadow it.
Erase the parts of the endings of the wrap that it looks like that it woud be spaned over the tube.
(see my tag for help)

- Highlight the mask layer.
Copy and paste one of the blings (Bling_04, _05 or _06).
Resize them a bit and add a dropshadow.

- Highlight your tube layer again.
Copy and paste the silver-butterfly (butterfly_05) and resize it very small.
Move it over the hair of your tube and add a small dropshadow.

- Choose a mataching background colour and as foreground colour choose a glitter-paper.
Write your name on your tag and add a dropshadow.
(I also added a glass effect)

- At least add all Copyright-information and/or watermark and save as.

Ready ♥

Tiny's Halloween Party


This tutorial was written by and copyrighted to Seven on 23rd October 2009

- Tiny D's Happy Spookoween -kit, which you can purchase here
- My Template #3 which you can download here
- Font of your choice (I used Gigi)


Let's start!

- Open my template.

- Copy a yellow or orange paper (pp25) from the kit and highlight the circle layer.
Selection - Selection all - Selection free - Selection not free.
Expand the selection about 1px.
Paste your paper into the selection.
Selection none.
Add a dropshadow to this layer.

- Repeat the above mentioned step with your stars (I used 3 different violet paper), the rectancle and the frame inlay (I used black ones).
Repeat this step also with the frame-layer (I used a green paper) but don't add a dropshadow.

- Highlight the frame layer and with your magic-wand click inside of the first rectangle of the frame and expand the selection about 1 px.
Resize and copy a monster or trickster from the kit.
Paste it to your canvas and move this layer under the frame layer.
Postion it that the head is in the frame.
Selection invert and hit delete.
(See my tag for help)

- Repeat this step above with the other parts of the frame.

- Add a dropshadow to your frame layer.

- Copy and paste two (or more) ghosts from the kit, resize and dropshadow them.
Move one to the left and the other one to the right side.

- Copy and paste a lollipop from the kit, resize it very small and dropshadow it.
Move it on the last frame to the right and rotate it a bit.
Duplicate this layer and mirror it.
Move it to the first frame to the left side.

- Highlight the background layer.
Copy and paste one of the glitter splashes and move it to the top.
Copy and paste the other glitter splash, mirror it and move it a bit to the ground.

- Choose your font and write your name.
Dropshadow it.

- At least you just have to add copyright-infos and/or watermark and save as.

Easy, or?


Mittwoch, 14. Oktober 2009

Kitsune


This tutorial was written by and copyrighted to Seven on 15th October 2009


For this tutorial you will need:

- Sabs' Hope is forever -kit, which you can download here.
- 1 picture/painture of your choice (I used the fabulous work of Suzanne Woolcott. You can purchase her stuff here.)
- Font of your choice (I used A&S BlackSwan)


Let's get ready!

- Open a new canvasn 550 x 550 px.

- Copy and paste the wire (element_03). Resize it and rotate it a bit. Add a small dropshadow.

- Copy and paste frame_07 and resize it a bit. With your magic wand or selection tool select the inner side of the frame.

- Copy and paste your picture move this layer under the frame layer and postion it into the frame. Invert the selection and press delete.

- Add a dropshadow to your frame.

- Copy and paste one of the paper circles (element_20 or _21), resize it and move this layer under the frame and picture layer. Postion it to the left higher side and add a dropshadow.

- Copy and paste one of the mats (element_06 or _07), resize and rotate it a bit. Move this layer to the right lower side and dropshadow it.

- Highlight your frame layer.

- Copy and paste a ribbon (element_04 or _05), resize it and move to the ground of your frame. Add a dropshadow.

- Copy and paste the big flower (element_35), resize and dropshadow it. Postion it to the left side of your wire and frame.

- Copy and paste yoour tag (element_40), resize and rotate it a bit and move it to the right side over your ribbon. Don't forget the dropshadow.

- Write your name and/or text on it and give it a small dropshadow.

- Copy and paste the butterflies (element_33 and _34) resize and decorate your tag with them. Add a dropshadow.

- At least just add copyright and/or watermark and save as.

Ready ♥

Samstag, 10. Oktober 2009

Magic of Halloween


This tutorial was written by and copyrighted to Seven on 10th October 2009.


For this tutorial you will need:

- My FTU-kit Ghost Train which you can download here
- A witch tube of your choice (I used one of the witch tubes which are in this kit)
- Mask of choice (I used WSL_Mask75 which you can get here)
- Xero - Radiance (optional)
- Halloween-Font of your choice (I usedMonsterChild)


Let's try it:

- Open a new canvas 600 x 500px

- Copy and paste a paper of your choice and apply the mask.

- Copy and paste the twirls, resize if necessary and add a small dropshadow.

- Copy and paste one of the ribbon, resize it and move it a bit to the middle of the canvas.
Dropshadow it.

- Copy and paste the book, resize it and add a dropshadow.

- Copy and paste spider01 and postion it over the star of your book.

- Copy and paste the stamp frame (frame16) and resize it.
Rotate it a bit. (see my tag above for help)

- With your magic click inside of the frame and expand the selection about 3px.

- Add a new raster layer and copy another paper of your choice.
Paste it into the selection.

- Move this layer under the frame layer.

- Copy and paste your tube. Postion it under the frame layer, so that the face is in the frame.
Invert the selection and press delete.
Selection none.

- If you want you can add the Cero-Radiance or an other nice effect on your tube.

- Add a small dropshadow to your frame.

- Copy and paste a candle of your choice, resize and dropshadow it.
Move it to the right side.

- Copy and paste a bow of your choice, resize it and postion it on the lower part of your candle.
Add a dropshadow.

- Choose your font and write your name in different but matching colours.
Add a small dropshadow.

- At least you just need to add copyright and/or watermark and save as.

Happy Halloween! ♥


Montag, 5. Oktober 2009

Perfectly Pink


This tutorial was written by and copyrighted to Seven on 05th October 2009.


For this tutorial you will need:

- Bea's PTU-kit Summer Love which you can get here
- A tube and a close up tube of your choice (I used a totally sexy tube of Keith Garvey which you can purchase at MPT)
- PlugIn Xero - Radiance


Let's start:

- Open a new canvas 600x600px.

- Copy and paste the wire, resize it and add a small dropshadow.

- Copy and paste a doodle (doddle3).

- Copy and paste the leaves (leaves2), resize a bit, add a dropshadwo and move it to the left.

- Copy and paste deco3 and add a dropshadow.

- Draw a feathered circle with your selection tool around the middle of the deco.

- Copy and paste a paper of your choice, move it below the deco.
Selection invert and hit delete 3 times.
Selection invert.

- Copy and paste your Close-Up tube and resize it.
Selection invert and hit delete again.
Selection none

- Apply the Xero Radiance plugin with the standardsettings and reduce the oppacity of the tube.

- Highlight the deco-layer.

- Copy and paste your tube, resize and dropshadow it.

- Choose a darker foreground and a lighter background colour and write your name.
Dropshadow it.

- Just add copyright info and/or watermark and save as.


Donnerstag, 1. Oktober 2009

Secrets


This tutorial was written by and copyrighted to Seven on 01st October 2009.


For this tutorial you will need:

- Dee's Frosted Velvet-kit, which you can get here.
- Tina's Template which you can download here.
- A woman-tube of your choice (I used a totally awesome tube of Jose A Cano which you can purchase at MPT)
- Mask of choice (I used WSL_Mask220 which you can get here)
- Font of your choice


Let's start!

- Open the template and resize it about 80 %.

- Delete the copyrigh-layer (Raster1).

- Highlight the circle up right layer.
Selection - free - not free and expand it about 1px.

- Copy one of the satin-paper (paper9 or paper10) and paste them into the selection.
Selection - none and add a small dropshadow.
Repeat this step on the circle downl left layer.

- Repeat the above mentioned step with the both smaller circles and the hearts.
Use for the circles something grungy or swirly and for the hearts the other satin paper.

- Add also a dropshadow to the diamond circles.

- Highlight the rectangle-layer and copy an other paper of your choice.
Selection - free - not free and expand it about 1px.
Paste the paper into the selection.
Expand the selection again but this time about 3px and add a new raster-layer.
Fill them with a dark color of your choice.
Move this layer below the rectangle layer and merge both layer.
Add a dropshadow

- Copy and paste one of the glitterdoodle (1 or 2), resize and move it down to the right edge of the rectangle. Add a small dropshadow. Duplicate this layer and mirror it horizontal and vertical.
Move it to the left higher edge of the rectangle.

- Copy and paste the hangingvine, resize and add a dropshadow move it above the circle layers.
Duplicate and mirror it horizontal and vertical.

- Copy and paste a flower (flower1) and resize it. Add a dropshadow and decorate your hangingvines with it. (I duplicated and resized it again)

- Copy and paste a charm of your choice, resize and dropshadow it. Move this layer under the hearts layer. (see my tag above for help).

- Copy and paste your tube position it to the center of your canvas and add a dropshadow.

- Highlight the wordart-layer and color it into a matching color and add a small dropshadow.

- Highlight the background layer and copy and paste a paper of your choice.
Use the mask on it.

- Add your name to the tag and dropshadow it.

- At least you just need to add copyright and/or watermark info and save as.

TOU

All tutorials are written by myself and any resemblance to any other tutorial is purely coincidental.
You are allowed to make tags, stats, layout what ever your want with them.
You are not allowed to make any monetary gain with them.
You are not allowed to hotlink.
I do not allow to translate it whithout my written permission!


It would be great if you mail me your results at coroners.sun@gmail.com

  © Blogger template Ramadhan Al-Mubarak by Ourblogtemplates.com 2008

Back to TOP